Save 50% Off MRSP on Lexington | Shop the Catalog >

How to Disassemble Office Chair


A desk chair usually gets taken apart for one of three reasons. It needs to fit through a doorway, it's heading into storage, or it's being packed carefully enough to come back out in working order. The difference between a smooth job and a frustrating one usually comes down to one detail: preserving the gas lift cylinder instead of treating the chair like a throwaway item.
That matters more than many homeowners realize. A well-made office chair can still earn its place in a guest room, home office, or online resale listing if the main components stay intact. This guide focuses on how to disassemble an office chair without damaging the parts that matter most, especially if the chair may be shipped, stored, repaired, or sold later.
Preparing to Disassemble Your Office Chair
A careful setup saves time later. Before a single screw comes out, the chair needs a protected workspace, the right tools, and a plan for hardware.
In the United States alone, over 100 million office chairs are sold annually, and improper removal of the gas lift cylinder leads to a 15–20% increase in return rates when recommended techniques are skipped, according to office chair disassembly guidance from Autonomous. That's a strong reminder that force alone isn't the answer. Technique is.
Set up the work area first
Choose a flat surface with room to flip the chair over safely. Cardboard, a moving blanket, or folded quilts will protect both the chair parts and the floor. Good lighting matters because stripped screw heads often start with a poor angle and a rushed first turn.
A nearby tray, sealable bags, and masking tape make the job cleaner. For homeowners also reworking a home office layout, it helps to think through the room before reinstalling anything. This guide to home office desk placement is useful for planning where the chair will return once the move or refresh is done.
Gather tools that match the chair
Most office chairs come apart by reversing the original assembly. That means hand tools usually handle the visible fasteners, while impact and prying handle the tapered gas cylinder connection.
| Tool | Purpose |
|---|---|
| Rubber mallet | Loosens friction-fit parts without striking metal too harshly |
| Pipe wrench with taped teeth | Grips the cylinder for leverage while reducing surface damage |
| Allen wrench set | Removes hex bolts on arms, backrests, and seat hardware |
| Phillips screwdriver | Removes standard screws on brackets and covers |
| Flathead screwdriver | Gently pries stuck casters or trim pieces |
| Sealable bags and labels | Keeps washers, bolts, and brackets grouped for reassembly |
For anyone sorting unfamiliar hardware, a quick refresher on fasteners for metal, wood, plastic helps identify why one screw backs out cleanly while another needs more controlled pressure.
Practical rule: Match the driver bit exactly to the fastener head before applying force. Most stripped hardware gets damaged in the first turn, not the tenth.
Protect the chair before protecting speed
Wrap duct tape around the teeth of the pipe wrench before it touches the cylinder. Keep closed-toe shoes on. Wear eye protection if any part may release suddenly. If the chair has upholstered arms or a finished back shell, lay those surfaces on padding, not directly on concrete or tile.
Homeowners across South Georgia and North Florida often move furniture between rooms, homes, and storage units more often than expected. A patient start keeps an investment-quality chair useful for the next stage instead of turning a simple project into a replacement job.
Removing Casters and Base
The base comes apart in two stages. First, remove the casters. Then separate the gas lift cylinder from the five-star base. These are simple steps in theory, but they're also where most accidental damage happens.
Pull the casters straight out
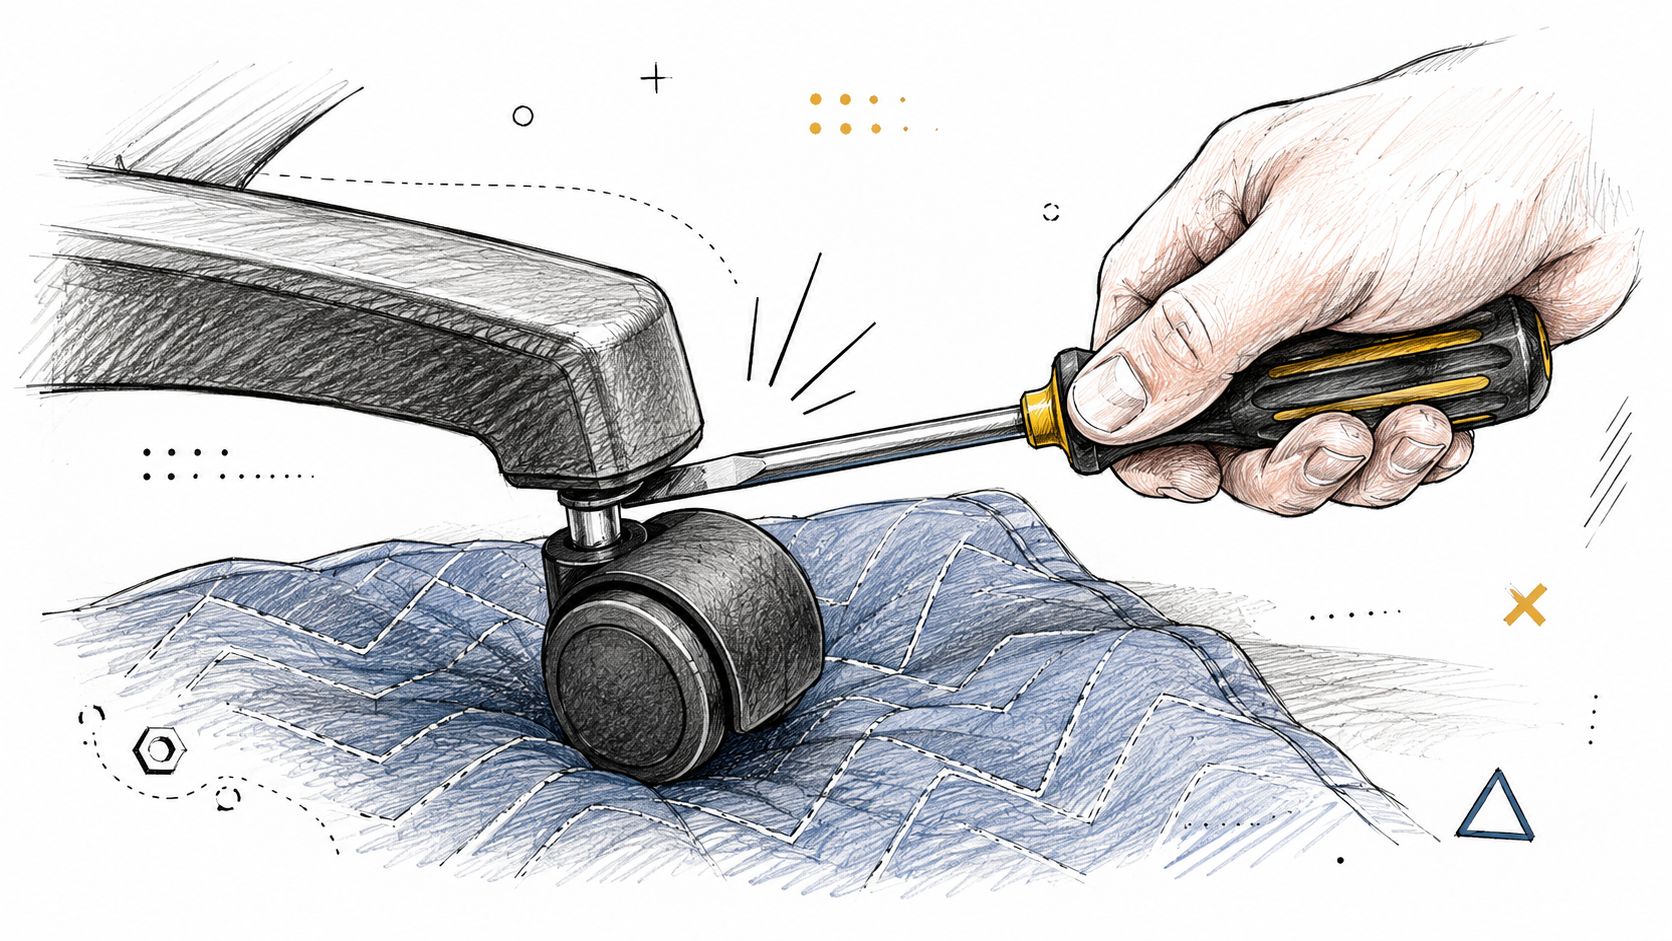
Flip the chair so the wheels face up. Most casters are press-fit into sockets, so they usually pull straight out with a firm tug. Grip each caster near the stem rather than yanking on the wheel itself.
If one sticks, slide a flathead screwdriver under the stem area and pry gently. Don't twist hard against the plastic base. Slow pressure is better than a sharp snap.
A protected floor matters here because the base can shift while the casters release. This guide on how to protect your floors from your furniture is a good companion if the chair is being moved across hardwood, tile, or luxury vinyl during the process.
Break the tapered lock without damaging the cylinder
The base-to-cylinder connection is where many people get frustrated. Disassembling an office chair relies on reversing its assembly, and the gas lift cylinder is held by a tapered friction fit that usually requires striking the mechanism's sides with a rubber mallet or using a pipe wrench with taped teeth to apply force to break the lock, as shown in this office chair disassembly demonstration.
That tapered fit means the cylinder isn't unscrewing. It's wedged in place.
Use this sequence:
- Turn the base upside down on padding.
- Clamp a pipe wrench near the lower part of the cylinder if additional force is required.
- Pull upward on the base while controlling the cylinder.
- Strike the sides around the connection area with a rubber mallet.
- Keep the blows controlled and consistent, not wild.
The goal isn't to beat the chair apart. The goal is to shock the taper loose while keeping the cylinder body usable.
What works and what usually doesn't
Some methods look forceful but solve nothing. Hitting the visible cylinder body directly with uncontrolled blows can dent it or compromise future use. Grabbing the base and twisting at random often burns energy without breaking the taper.
What usually works best is a steady combination of force, support, and repeated side impacts at the connection point. Once the lock breaks, the release can happen suddenly. Keep feet clear and don't let the base slam onto the floor.
For shipping or resale, this step deserves extra patience. A base with intact sockets and a cylinder without unnecessary damage is far easier to pack, store, and trust later.
Detaching Seat Arms and Backrest
Once the base is off, the rest of the chair usually feels straightforward. This is the stage where precision matters more than strength. Most damage here comes from stripped fasteners, torn upholstery near brackets, or mixed hardware during removal.
Remove hardware in a controlled order
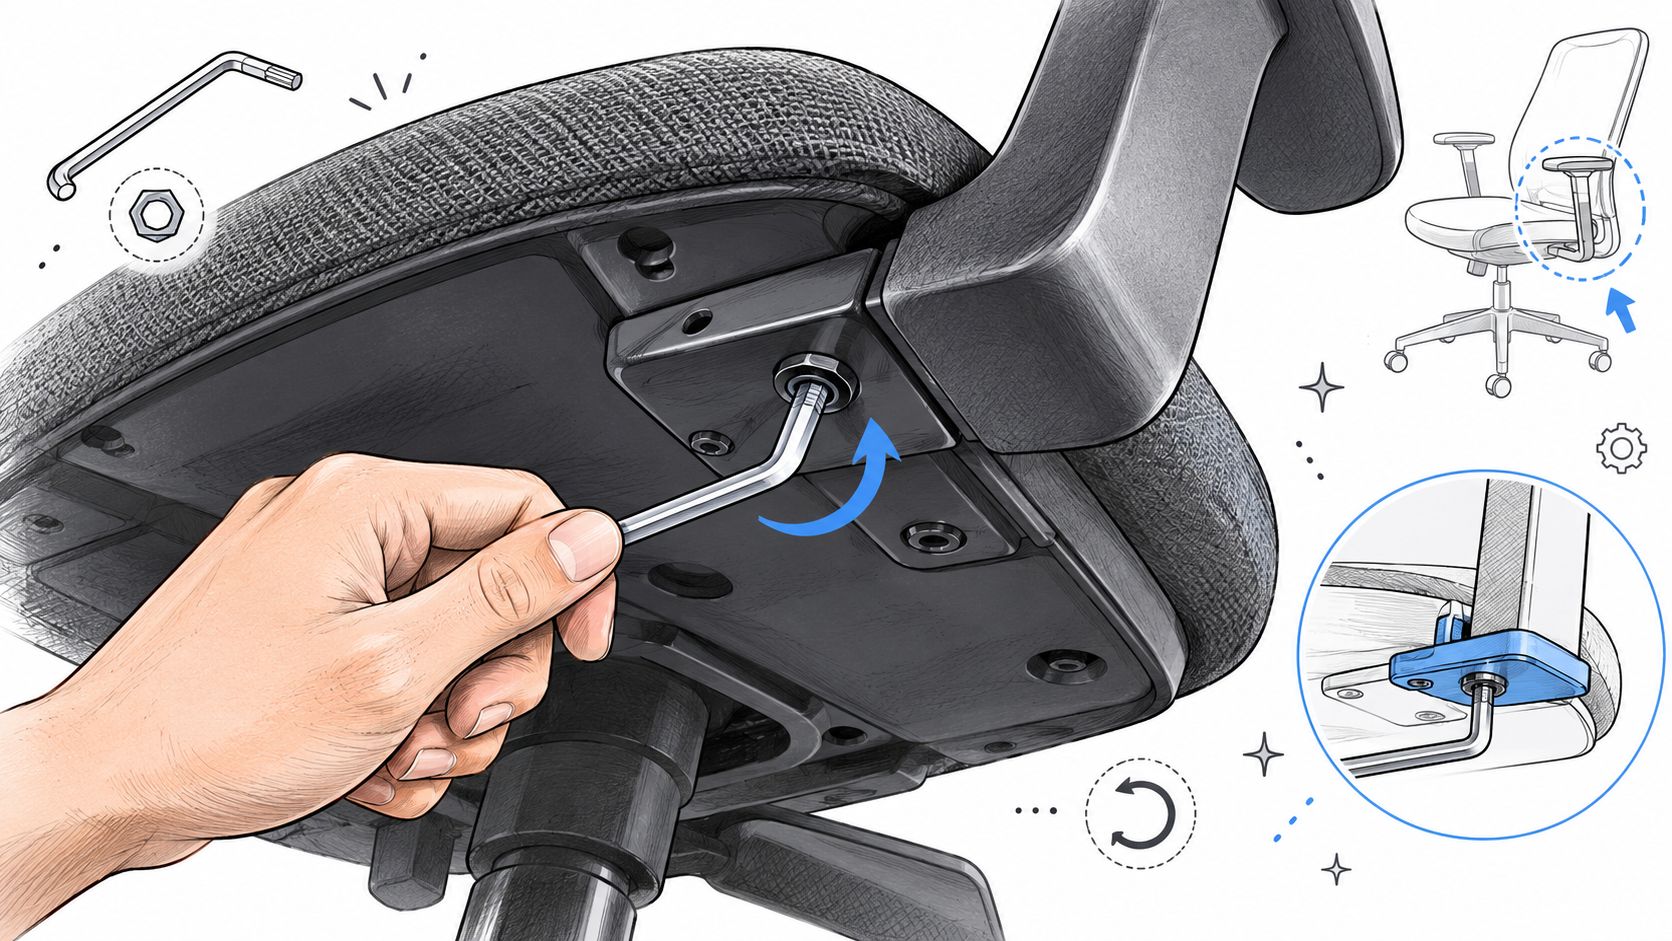
Lay the seat upside down on a padded table or blanket. Look underneath for the arm and backrest attachment points. Some chairs use Allen bolts, others use Phillips screws, and some combine both.
Loosen each fastener with steady downward pressure. If a bolt resists, stop and reseat the tool before trying again. That small pause can save the head from rounding off.
A clean sequence usually works best:
- Arms first: They're often the easiest external parts to remove and give better access to the seat frame.
- Backrest second: Support the back with one hand while removing the final fastener so it doesn't drop against the upholstery.
- Decorative caps last: If the chair has trim covers, remove and store them after the main structural pieces are free.
Watch the upholstery and finish surfaces
Chairs with upholstered arms or wrapped back panels need extra care once the hardware loosens. A bracket edge can rub against fabric or leather in a second. Set each removed part on a soft surface immediately.
For households concerned about long-term fabric performance, this overview of stain-resistant upholstery fabric is helpful when planning future replacements or upgrades.
A removed armrest should never dangle by one remaining bolt. Support it fully, then take out the last fastener.
Expect brand-to-brand variation
Not every office chair comes apart the same way. Some have simple external arm brackets. Others hide fasteners under trim panels or integrate back supports more tightly into the frame. That's especially true across better-known furniture lines often found in homes across South Georgia and North Florida.
Examples of brands homeowners often recognize include:
- La-Z-Boy
- Stressless
- Lexington
- Hooker Furniture
- Smith Brothers
The basic rule stays the same. Remove only the external components intended for service or transport. Leave the internal tilt mechanism alone unless the manufacturer specifically designed it for disassembly. Once that mechanism is disturbed, the chair can become difficult to reassemble correctly and may never feel the same again.
Organizing Parts for Reassembly
A chair can be taken apart perfectly and still become a headache later if the hardware gets mixed together. Order matters just as much after removal as it does during it.
Bag parts by component, not by size
Don't throw every bolt and washer into one container. Separate them by where they came from. One bag for arms, one for backrest hardware, one for trim pieces, and one for casters keeps the logic intact.
A simple labeling system works well:
- Arm hardware: left and right if they differ
- Backrest bolts: include washers and spacer pieces together
- Base parts: casters, clips, and any covers
- Seat mechanism covers: small trim pieces only
Tape each bag directly to the corresponding part when possible. That reduces the chance of a hardware bag getting left in the bottom of a moving carton.
Create a visual reference before packing
A smartphone photo at each stage makes reassembly easier than memory alone. Take one wide photo of the chair before starting, then one close-up each time a major component comes off. Focus on bracket orientation, washer order, and which side faces front.
Professional delivery and setup teams rely on repeatable systems for the same reason. This look at furniture delivery and assembly shows why organized hardware and sequence tracking matter when furniture has to arrive ready for use.
For longer storage periods, it also helps to review practical tips for storing furniture safely so upholstery, metal finishes, and loose components stay protected between moves.
Good organization shortens reassembly time and reduces the temptation to “make a bolt work” where it doesn't belong.
Troubleshooting Disassembly Challenges
Even a well-built chair can fight back. Corroded bolts, seized cylinders, and worn fastener heads are common trouble spots. The key is solving the problem without escalating damage.

If screws or bolts won't budge
Apply a small amount of penetrating oil to the stuck fastener and give it time to work into the threads. Wipe away excess before handling upholstered or plastic parts. Then press the tool firmly into the head and turn slowly.
If the head is already rounded, switch to a screw extractor rather than forcing a poor grip. Support the part from below so the fastener isn't carrying the full load while you work it free.
If the cylinder still won't release
A stubborn taper fit often needs better shock, not reckless force. Try a slightly heavier mallet or place a wooden block between the striking tool and the wrench area to soften impact while transferring force. Keep the chair stable and maintain control of the base in case it lets go all at once.
Wear gloves and eye protection throughout. If the chair is already at the point where repair no longer makes sense, this page on old furniture removal can help with the next decision.
What not to do under pressure
Don't attack the internal tilt mechanism. Don't use uncontrolled metal-on-metal blows on visible finished parts. Don't keep turning the wrong bit in a stubborn screw head and hope it catches.
Most disassembly problems get worse because someone keeps repeating a failed approach. Change the angle, improve the grip, reduce strain on the part, and work methodically.
Final Checks and Next Steps
Before packing the chair away, inspect each component with a practical eye. Look for cracked caster sockets, bent brackets, damaged threads, torn upholstery near mounting points, and any scoring on the gas lift cylinder. A careful review now is better than discovering the issue halfway through reassembly.
This step matters even more for resale or shipping. Industry data shows that 40% of online office chair listings fail due to damaged cylinders from improper removal, and many guides miss the distinction between disassembly for shipping versus disposal and the need to preserve components for resale, according to this office chair disassembly guide. If the cylinder seal and body remain intact, the chair keeps more of its usefulness and marketability.
Decide whether the chair is being stored, shipped, repaired, or replaced
The best packing method depends on the next destination.
- For storage: Wrap upholstered pieces in breathable protection and keep hardware attached in labeled bags.
- For shipping: Pad all contact points, especially the cylinder, arm brackets, and back corners.
- For repair: Keep parts accessible and don't bury the hardware in a larger moving box.
- For disposal or office clear-outs: Review professional guidance on commercial furniture decommissioning if the project involves multiple pieces or a larger workspace transition.
Use the moment to upgrade thoughtfully
Disassembly often reveals what worked and what didn't. Maybe the chair needs new upholstery. Maybe arm height never felt right. Maybe the finish no longer fits the room.
For homeowners furnishing curated spaces across South Georgia and North Florida, this is also a useful moment to think about customization and support:
- Special Order flexibility: Most vendors support personalized designs in fabrics, finishes, and comfort levels.
- Expert guidance: Style Quizzes, a Mattress Guide, and in-store associates can help narrow design decisions.
- Omnichannel ease: It's easy to move between a digital catalog and showroom visits in Fernandina Beach, FL.
A few well-known names often explored for office and whole-home comfort include:
- La-Z-Boy
- Lexington
- Stressless
For any investment-quality piece, white-glove in-home delivery and a rigorous multi-point inspection matter just as much as product selection. Careful handling doesn't start at the door. It starts with standards.
If the chair is ready for replacement, customization, or a full room refresh, Lott's Furniture offers a direct path from online inspiration to in-store guidance. Homeowners in South Georgia and North Florida can explore the digital catalog, use the Style Quizzes and Mattress Guide, or visit the Fernandina Beach showroom for help from knowledgeable associates. Every piece is backed by white-glove, in-home delivery and a rigorous multi-point inspection, making it easier to furnish a comfortable, customized home with confidence.